An introduction of NestJS, a Node.js web/app server framework.
This tutorial/review is written for Rebecca for enhancing the understanding of NestJS and Backend Programming 🎉
Note that this post can be used as a complement of the official tutorial of Nest.js. I believe that official documents are best fit to learn a tech, so I recommend you to take a step-by-step hands-on tutorial first from the following link.

This post aims to explain basic concepts in back-end programming. Although NestJS is a Node.js (JavaScript) tech-stack, you will have a thorough understanding of many concepts of designing back-end/API programming (not specifically for Node.js) after reading this post.
Before we start
Create a NestJS project using the Nest CLI tool, choose any package manager you like (I prefer yarn):
nest new hello-nestIn order to support Intellij IDEA/WebStorm, we need to apply the following configurations after opening the created project. In JetBrains IDE:
- Click on the dropdown menu next to the Run/Debug configurations in the top-right corner of the IDE.
- Select "Edit Configurations" or "Add Configuration" option. This will open the Run/Debug Configurations dialog.
- Click the "+" button in the top-left corner of the dialog to add a new configuration.
- Choose "Node.js" from the list of configurations.
- In the "Name" field, provide a meaningful name for your configuration (e.g., "Nest.js").
- In the "JavaScript file" field, enter the path to the Nest CLI file, typically
node_modules/.bin/nest, or use the full path to thenestexecutable. - In the "Application parameters" field, enter the Nest.js CLI command you want to use, such as
startfor running your application. - Set the "Working directory" to the root folder (which will automatically generated by the IDE) of your Nest.js project.
FYI, you can follow the detailed Node.js configuration tutorial provided by JetBrains in the following link.

Well done, you have configured the Run/Debug button. You can now simply click Run button to run the server.
The default port number of NestJS created by CLI is 3000. After you run the server, you can use your web browser to navigate to http://localhost:3000 and you can see the "Hello World!" message, which means a successfully run of NestJS.
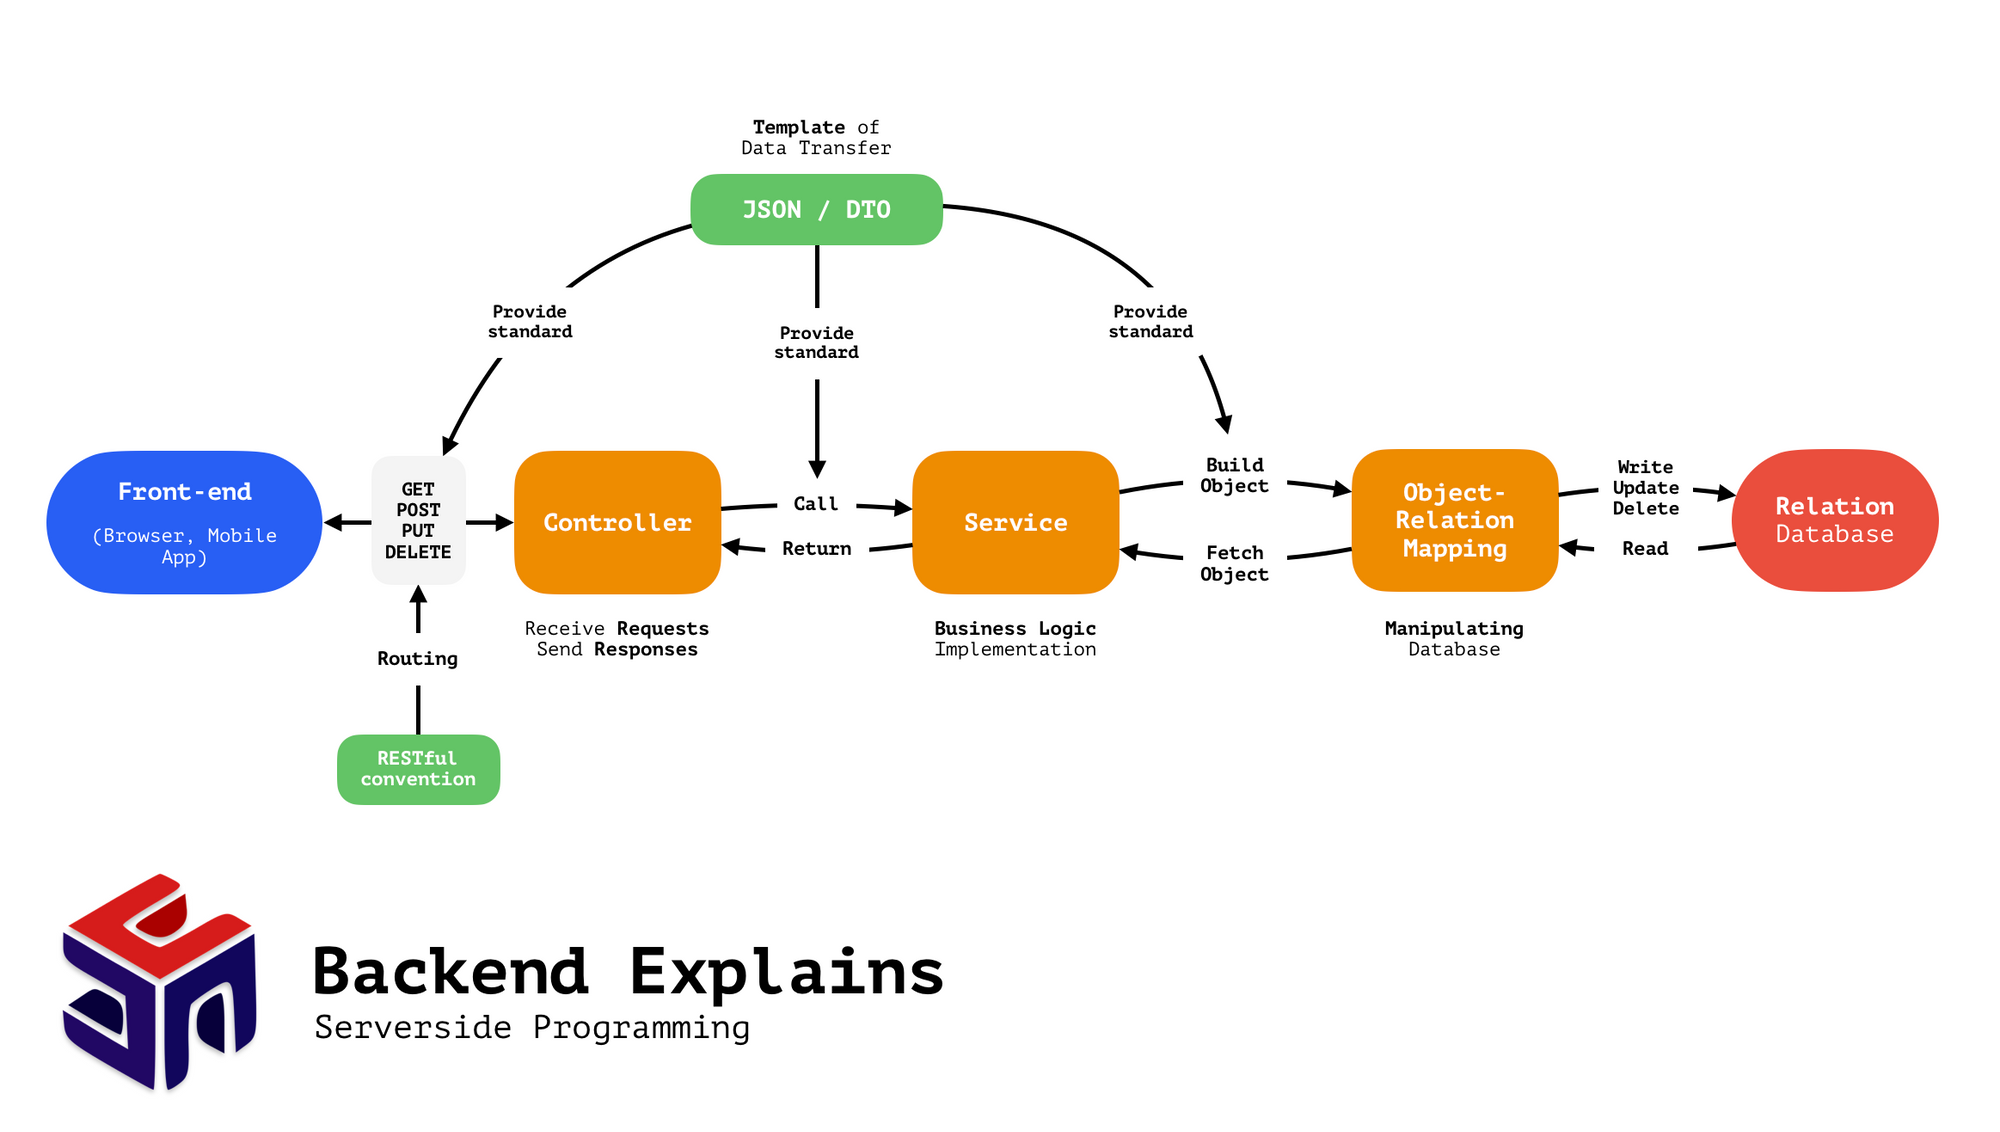
Controllers
Controllers are the codes to receive requests and send responses. It works like a bank teller. Here is a piece of code of controller:
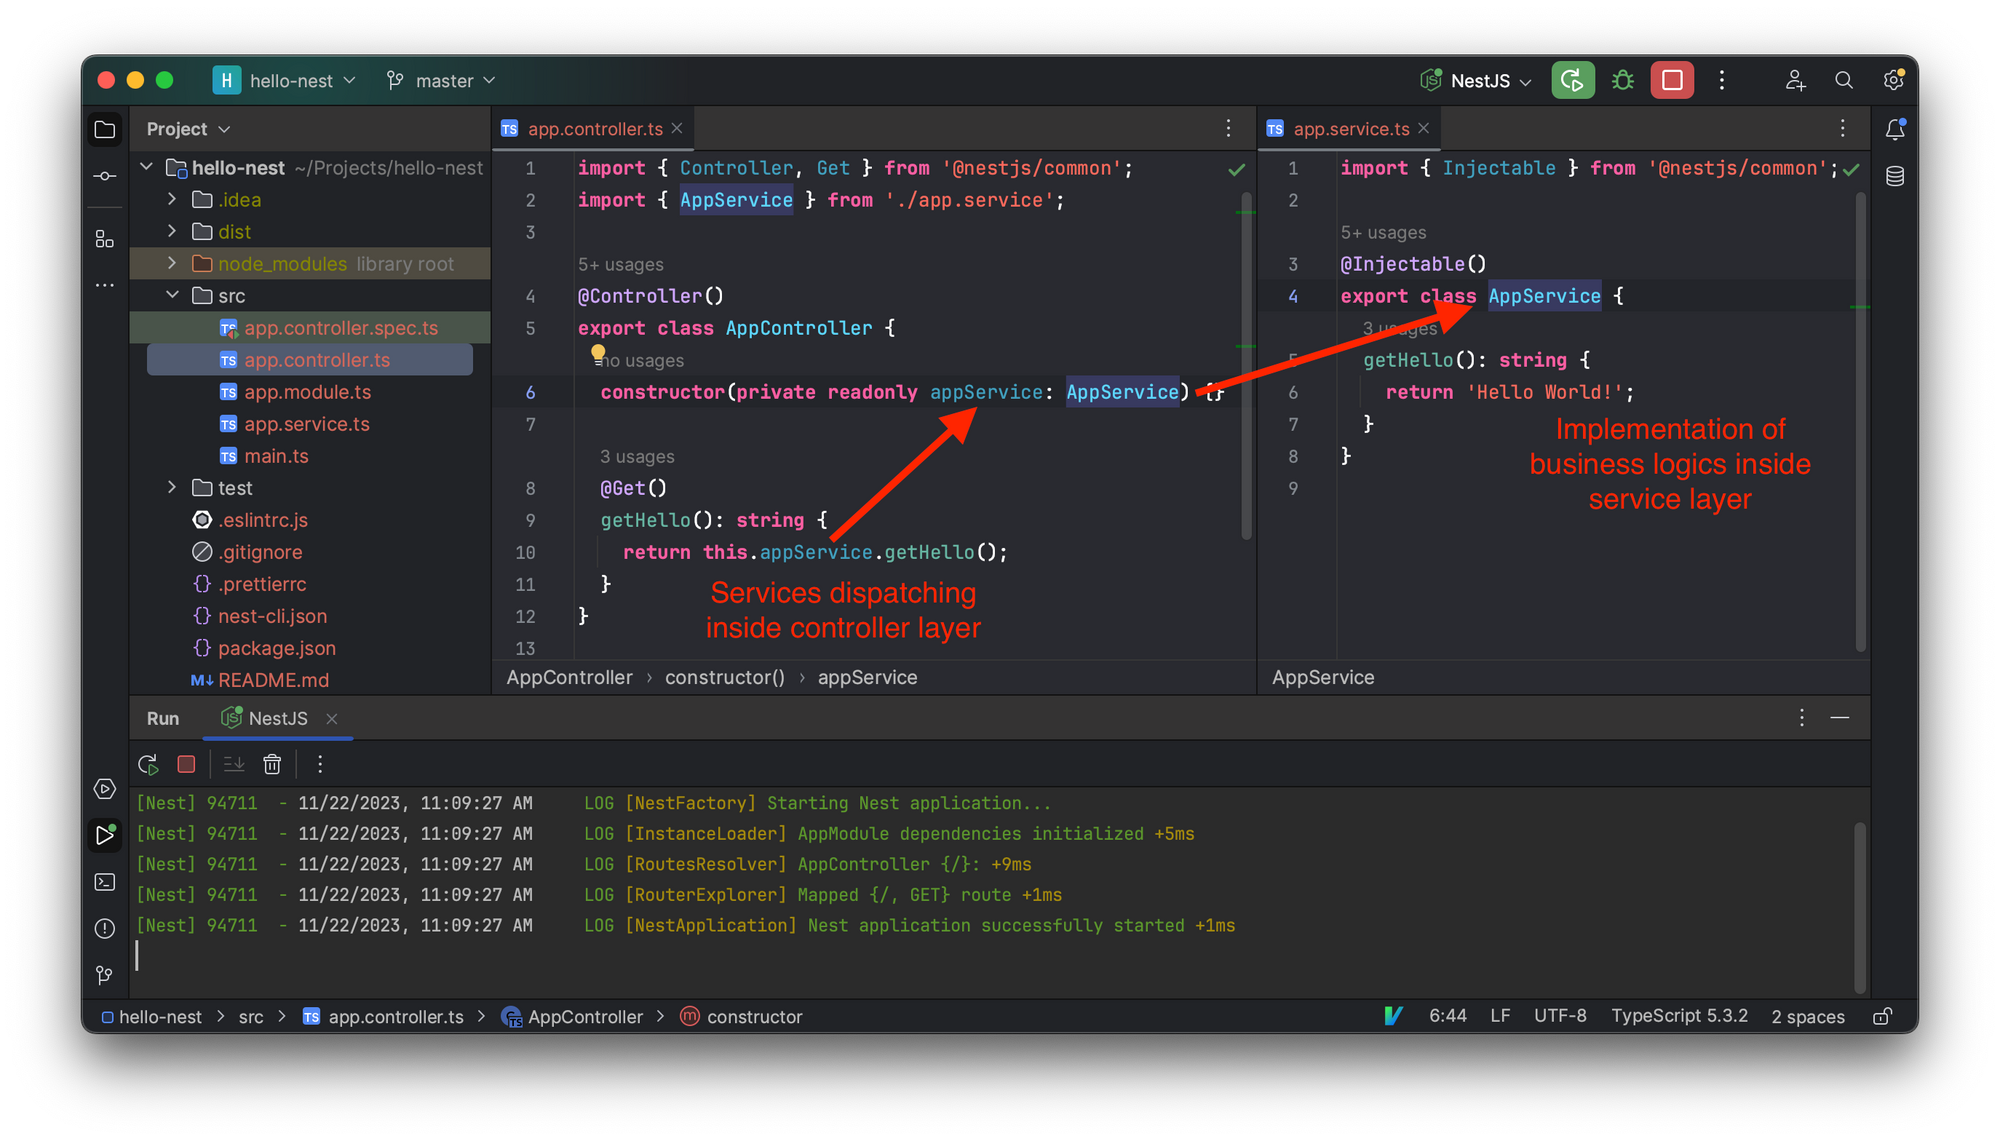
Mention that you should not write any implementation in controller layers (although you are allowed) since service layers are designed for code reuse.
Controllers should handle HTTP requests and delegate more complex tasks to services, which are plain TypeScript classes that are declared as providers in a module (building block that helps organize and structure the code of your application) as following code.
// app.module.ts

@Module({
  imports: [],
  controllers: [AppController],
  providers: [AppService],
})
Services
NestJS utilizes the concept of "providers" for creating and managing services. In NestJS, a provider is a class annotated with the @Injectable() decoratorYou may like to alternate the generated code inside app.service.ts to play with implementation of business logics.
// app.service.ts

import { Injectable } from '@nestjs/common';

@Injectable()
export class AppService {
  private async getCurrentTime(): Promise<string> {
    return new Promise((resolve) => {
      setTimeout(() => {
        resolve(new Date().toLocaleTimeString());
      }, 1000);
    });
  }
  async getHello(): Promise<string> {
    const currentTime = await this.getCurrentTime();
    return 'Hello World! And the current time is ' + currentTime + '';
  }
}
By visiting localhost:3000, you get Hello World! And the current time is 12:06:50 PM.
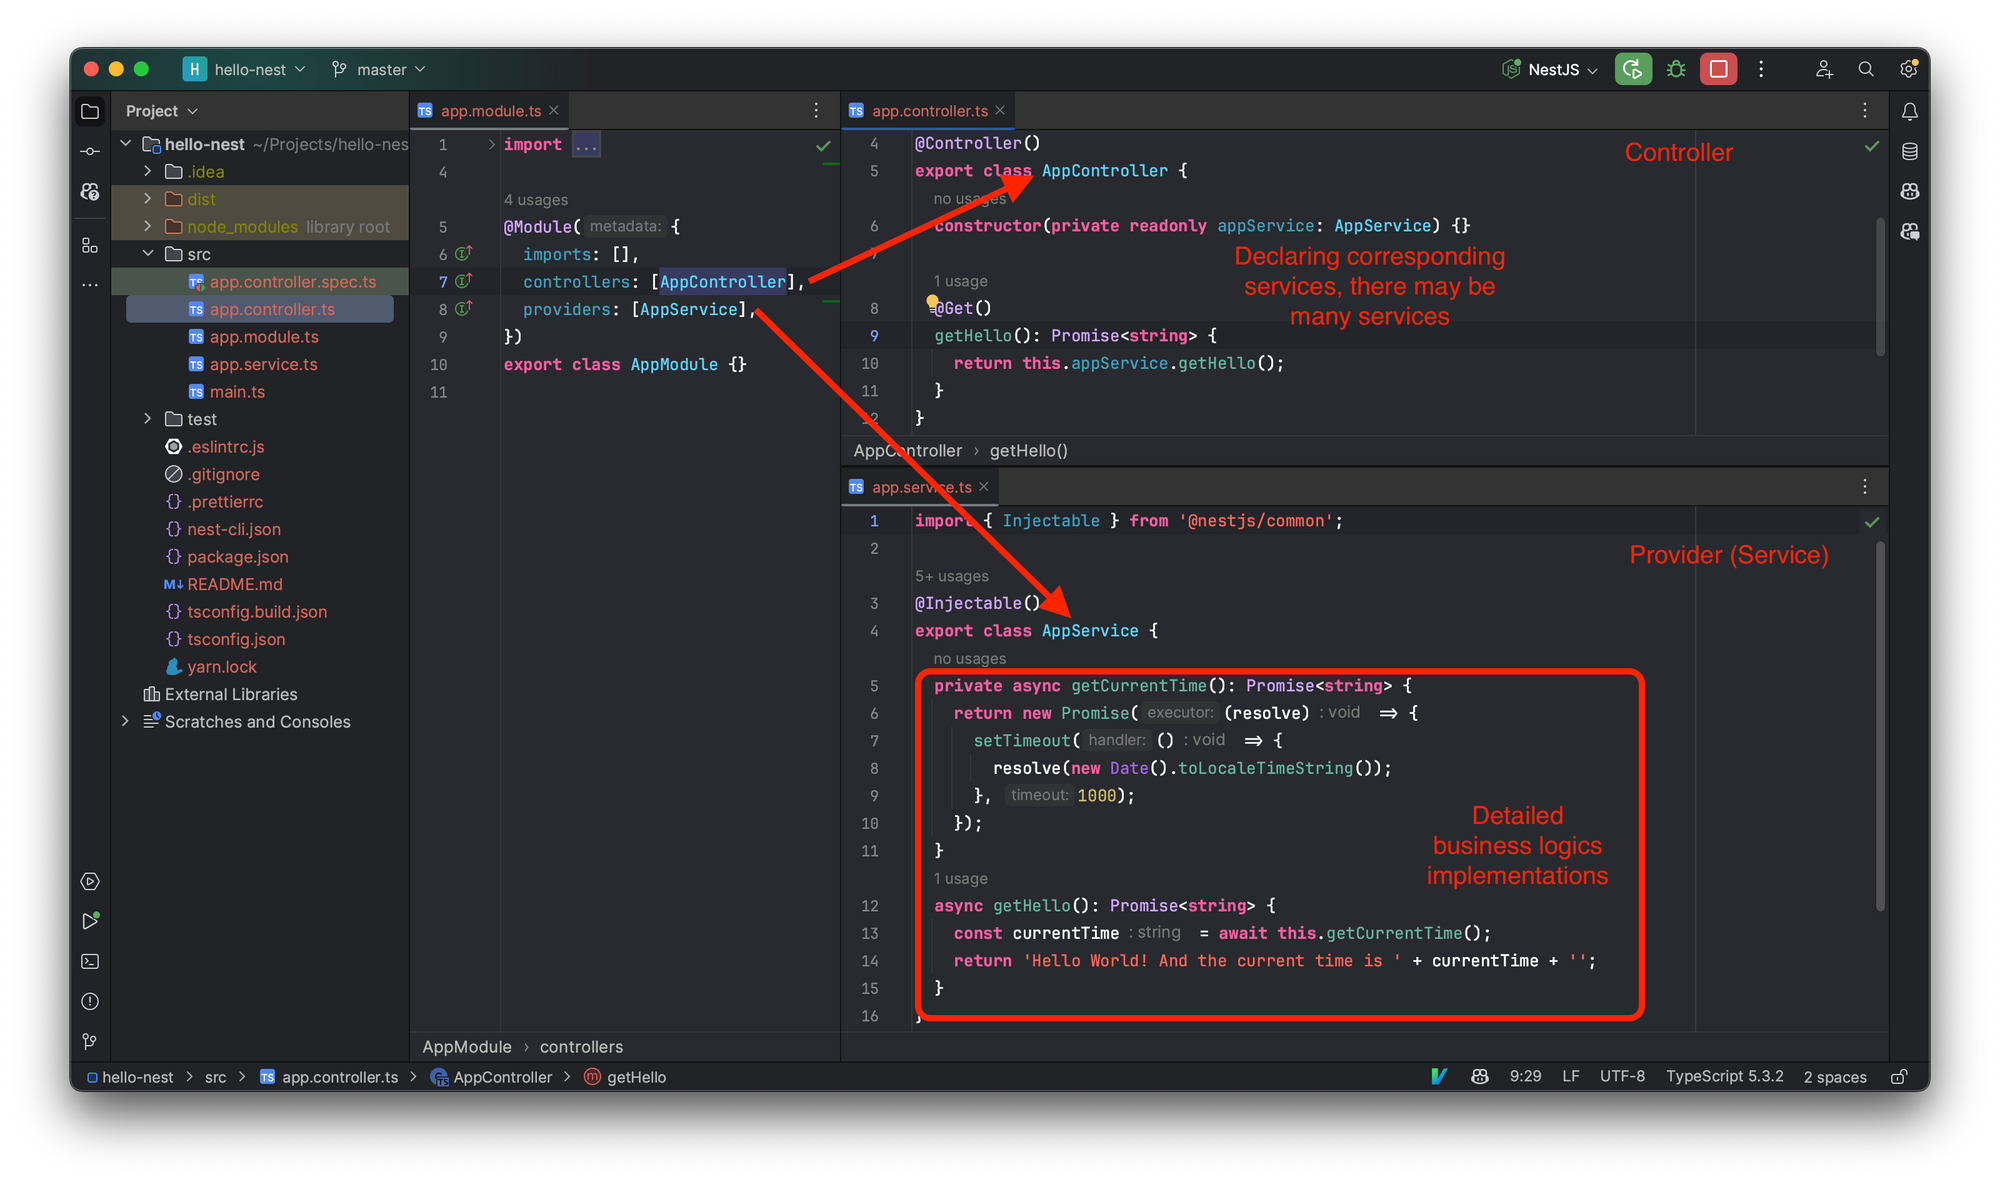
You should implement any business logics inside Services. As the following code given, the getCurrentTime() method get a current local time. It is declared with private means the method can only be called inside app.service.ts.
Method Scoping (annotated with private, public, ...) is important since it provides functions of encapsulation, security. It also create a maintainable code.
Here is why it provides a maintainable code: Image that you are at a bank. You have a business account and an individual account. You go to the business counter: /business/deposit and you sign a form (request JSON)
{
  "accountId": 99887766,
  "amount": 1000,
  "currency": "USD",
  "authentication": "xxxxxxxxxxx"
}
The counter teller knows that you want to deposit 1000 USD to account 99887766, and you also provide a legal signature (authentication), which means you are actually you (although it can be forfeit by some approaches, if you are interested in it, go to play CTF!).
The service code inside business.service.ts may be look like:
import { Injectable } from '@nestjs/common';

@Injectable()
export class BusinessService {
  private async transaction(mode: string, amount: number, currency: string, accountId: number): Promise<boolean> {
    console.log(' >>> Transaction begin >>> ');
    console.log('mode: ' + mode);
    console.log('amount: ' + amount);
    console.log('currency: ' + currency);
    console.log('accountId: ' + accountId);
    console.log(' <<< Transaction end <<< ');
    return true;
  }
  async deposit(amount: number, currency: string, accountId: number): Promise<string> {
    const status = this.transaction('deposit', amount, currency, accountId);
    return 'deposit complete, status: ' + status;
  }
}
The private scope states that transaction() can be only used in business.service.ts, which means it handles only business services. When we implement individual.service.ts, there can also be a private transaction() method for individual services, which creates a maintainability. (otherwise we may write code transaction_business() and transaction_individual() )
Routing Mechanism and RESTful convention
Controllers need routing mechanism (there are different bank services, individual, business, ...). Routing is implemented by concating of URL. A RESTful design (convention) of URL is like:
/account/create
/account/{id}/delete
/account/{id}/update
/account/{id}
/item/{id}
/items
/item/page/10
Where {id} is user id for any individual users, such as 1145141919810. The URLs in the previous code blocks represents create a user, delete a user according to his/hers id, such as /account/1145141919810/delete, update a user according to id, and read user information (such as email) according to a id. Generally speaking, what server's job, commonly, are Create, Read, Update and Delete (CRUD).
/items/{id} demostrates routing. The manipulation within the Controller that listening on the URL starts with item is item-related. Image an online shopping website, if we want to get information of a specific item by its item id.
/items, as you guess, this URL is for retrieving all items (products) as a huge list.
Similarly, follow the RESTful convention, /item/page/10 retrieving a specific page (the 10th page) of a collection of items. It works for pagination of a list of products in an online shopping website, since using one page to display all products is dumm.
Note: in a modern front-end back-end separation design of web applications. These URLs returns a JSON rather than a rendered web page. Front-end back-end separation design is much similar to the pattern of Mobile/Embedded Application design.
Overall View