
Implementing Convolutional Neural Networks with Keras
Introduction
Keras is a Deep Learning library for Python, after learning Intro to Neural Networks and Intro to Convolutional Neural Networks from Victor Zhou, These two posts produce implementations of Neural Networks and CNN from scratch (using only NumPy), To refresh the knowledge while reviewing it, I decided to write a Note.
A Neural Network consists of a bunch of Neurons connected together with differentiated by Layers, i.e. Input Layers, Hidden Layers(Conv, Pooling, Activation Functions Layers, Fully Connected Layer) and Output Layers. Hidden layers make neural networks superior to most machine learning algorithms.
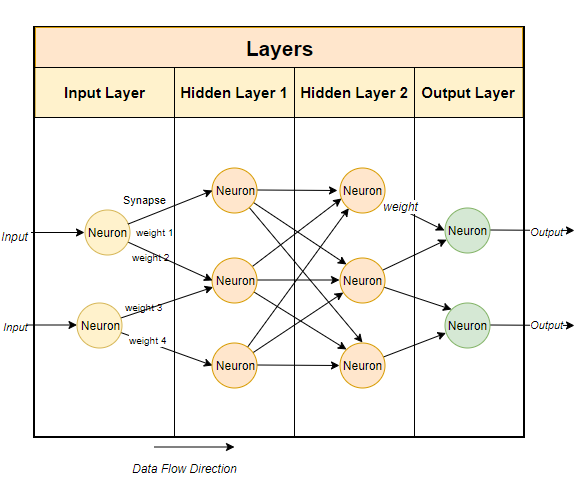
Training a Neural Network model, in a nutshell, is changing the network's weights and biases to decrease the loss of the model, actually, the goal of every type of Neural network is that. We use loss functions, i.e. MSE loss function (Mean Squared Error), Cross-entropy cost function to calculate loss, now we have a loss, with the help of backpropagation (反向传播) algorithm and gradient descent (梯度下降) algorithm (opt-algorithm called stochastic gradient descent) to alternate parameters. This kind of Neural Network is called Feedforward Neural Network (前馈神经网络).
| EN | 中文术语对照 | Keras Loss Function |
|---|---|---|
| Mean Squared Error | 均方误差 | mse |
| Binary Cross-entropy | 二维交叉熵 | binary_crossentropy |
| Categorical Cross-entropy | 多分类交叉熵 | categorical_crossentropy |
After iterations of many times, our Neural Network increases the accuracy step by step. Finally, we save the trained model. That's it — a brief process of Training a Neural Network.
Implements
If you'd like to learn it in detail, reading this article is a good choice Intro to Neural Networks, you need to learn Partial Derivative if you want to calculate together with this article. But for now, I would like to use tensorflow.Keras to implement it without caring about how it works inside.
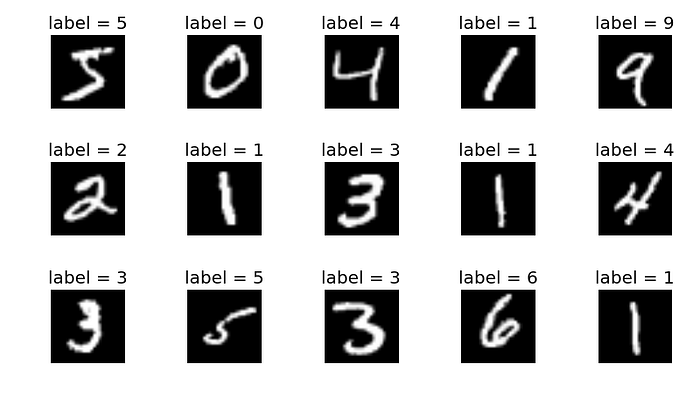
What we will do is to classify handwritten digits(0-9) into labels, we introduce the dataset from mnist , it looks like this.
Now that we can see we want to build a classifier, actually, that is a model. Let's start implementing it as follows.
At first, we need to import packages we need, you may use pip install <package-name> to install it if you do not have it. mnist is a dataset that contains 60000 handwriting Arabic numbers from 0 to 9 with labels for testing, and we import keras , from keras we need to import models.Sequential to create Sequential model, since our CNN will be a linear stack of layers, models.Dense to create fully-connected layers, we also need utils.to_categorical to get the prediction metric. Moreover, to import matplotlib.pyplot, we can take a glance at mnist dataset.
import numpy as np
import mnist

from tensorflow import keras
from tensorflow.keras.models import Sequential
from tensorflow.keras.layers import Dense
from tensorflow.keras.utils import to_categorical

import matplotlib.pyplot as plt
Build Model
Then it's time to build a model, we need to use Sequential class. Designing model_cnn , I chose a sequence of Conv -> MaxPool -> Conv -> Softmax , what we need to mention is that only declaring input_shape once in the first layer is OK. As this article will not expand in explaining the details about every layer, you can check this article from Keras Layers API if you want to learn about it. Briefly Speaking, Conv is for reserving characteristics of data, Pool is for the increasing receptive field (感受野) or making the data more unified, it can shrink the resolution. Softmax is for outputting the Layers before in 10 possibilities which represent each digit (0-9).
num_filters,filter_size, andpool_sizeare self-explanatory variables that set the hyperparameters for our CNN.- The output Softmax layer has 10 nodes, one for each class.
num_filters = 8
filter_size = 3
pool_size = 2

model_cnn = Sequential([
    Conv2D(num_filters, filter_size, input_shape=(28, 28, 1)),
    MaxPooling2D(pool_size=pool_size),
    Conv2D(num_filters, filter_size),
    MaxPooling2D(pool_size=pool_size),
    Flatten(),
    Dense(10, activation='softmax'),
])
Compile Model
Meanwhile, we need to add some parameters to configure the training process. Our model_cnn including optimizer, loss function and a list of metrics that contain accuracy since this is a classification problem.
model_cnn.compile(
    'adam',
    loss='categorical_crossentropy',
    metrics=['accuracy'],
)
Train Model
OK, It's time to train it, get data then centralize (or normalize), We’ll also reshape each image from (28, 28) to (28, 28, 1) because Keras requires the third dimension. then setting epochs, i.e. training times.
# Import images.
train_images = mnist.train_images()
train_labels = mnist.train_labels()
test_images = mnist.test_images()
test_labels = mnist.test_labels()

# Normalize the images.
train_images = (train_images / 255) - 0.5
test_images = (test_images / 255) - 0.5

# Reshape
train_images = np.expand_dims(train_images, axis=3)
test_images = np.expand_dims(test_images, axis=3)

model_cnn.fit(
    train_images,										# x_train
    to_categorical(train_labels),   # y_train
    epochs=3,
    validation_data=(test_images, to_categorical(test_labels))
)

# Save the model
model_cnn.save_weights('model_cnn.h5')
You can take a glance at test_images[0]
plt.imshow(test_images[0])
Now, Shift + Enter to run it. If you did not go wrong, the output will be like that.
Epoch 1/3
1875/1875 [==============================] - 9s 5ms/step - loss: 0.2870 - accuracy: 0.9160 - val_loss: 0.1344 - val_accuracy: 0.9585
Epoch 2/3
1875/1875 [==============================] - 9s 5ms/step - loss: 0.1276 - accuracy: 0.9613 - val_loss: 0.0878 - val_accuracy: 0.9724
Epoch 3/3
1875/1875 [==============================] - 8s 4ms/step - loss: 0.0990 - accuracy: 0.9697 - val_loss: 0.0794 - val_accuracy: 0.9750
Using Model
Using the trained model to make predictions is easy: we pass an array of inputs to predict() and it returns an array of outputs. argmax() is a method that turns [.1, .1, .15, .12, .05, .08, .09, .11, .09, .11] to 2 (max index)
# Predict on the first 5 test images.
predictions = model_cnn.predict(test_images[:5])

# Print our model's predictions.
print(np.argmax(predictions, axis=1)) # [7, 2, 1, 0, 4]

# Check our predictions against the ground truths.
print(test_labels[:5]) # [7, 2, 1, 0, 4]
Conclusion
Steps are Build Model -> Compile Model -> Train Model -> Predict, to make a more accurate result, designers should add some Layers in specific orders, or use another kind of layers like activation function
Meanwhile, changing Network Depth, Dropout, Full-connected layers and convolution parameters can also make a better result.
Project Full Code
import numpy as np
import mnist

from tensorflow import keras
from tensorflow.keras.models import Sequential
from tensorflow.keras.layers import Dense
from tensorflow.keras.utils import to_categorical

import matplotlib.pyplot as plt

num_filters = 8
filter_size = 3
pool_size = 2

model_cnn = Sequential([
    Conv2D(num_filters, filter_size, input_shape=(28, 28, 1)),
    MaxPooling2D(pool_size=pool_size),
    Conv2D(num_filters, filter_size),
    MaxPooling2D(pool_size=pool_size),
    Flatten(),
    Dense(10, activation='softmax'),
])

model_cnn.compile(
    'adam',
    loss='categorical_crossentropy',
    metrics=['accuracy'],
)

# Import images.
train_images = mnist.train_images()
train_labels = mnist.train_labels()
test_images = mnist.test_images()
test_labels = mnist.test_labels()

# Show images.
plt.imshow(test_images[0])

# Normalize the images.
train_images = (train_images / 255) - 0.5
test_images = (test_images / 255) - 0.5

# Reshape
train_images = np.expand_dims(train_images, axis=3)
test_images = np.expand_dims(test_images, axis=3)

model_cnn.fit(
    train_images,										# x_train
    to_categorical(train_labels),   # y_train
    epochs=3,
    validation_data=(test_images, to_categorical(test_labels))
)

# Save the model
model_cnn.save_weights('model_cnn.h5')